https://wpforms.com/how-to-customize-button-styles-with-css-with-examples/
https://wpforms.com/docs/how-to-add-custom-css-to-your-wpforms/
Do you want to change the look of your forms’ buttons? WPForms allows you to make basic customization on your buttons using the drag and drop form builder. For advanced customization, you can add custom CSS snippets to your WordPress theme. In this article, we’ll show you how to customize button styles with CSS.
Customizing Button Styles of Your Forms
With WPForms, you can customize the buttons of your forms in two ways. You can either customize button styles for all of your forms or you can style each one individually.
We’ll go over how to use each method.
Method 1: Making Sitewide Customization
Customizing button styles of all of your form buttons is pretty easy once you have the
CSS code you want to use. If you like, you can just copy and paste one of the examples below, or even combine them.
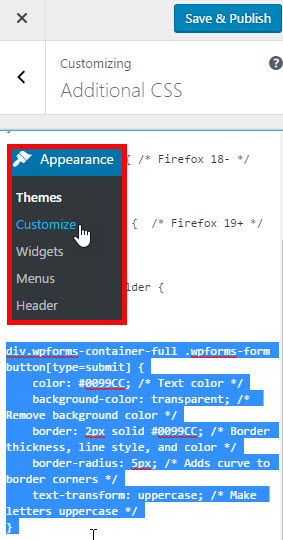
The code snippet needs to be pasted into your Additional CSS section in the Customize panel. This can be done by navigating to Appearance » Customize » Additional CSS.
Then just click Save & Publish, and you’re done.
Method 2: Customizing a Button Individually
What if you just want your new style to be used on a single WPForms form, but not every form on your site?
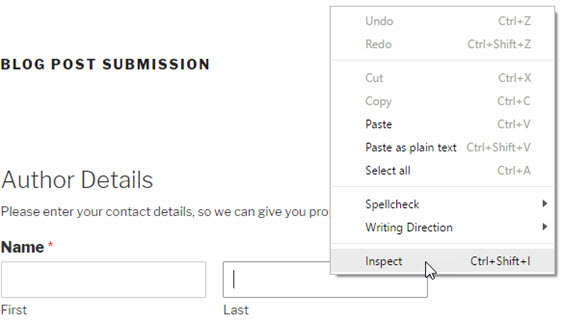
Before you can customize the button style of an individual form button, you need to find the unique ID of your form.
Simply open a page containing the form you want to modify. Take your mouse to any field in the form, right click » Inspect Element.
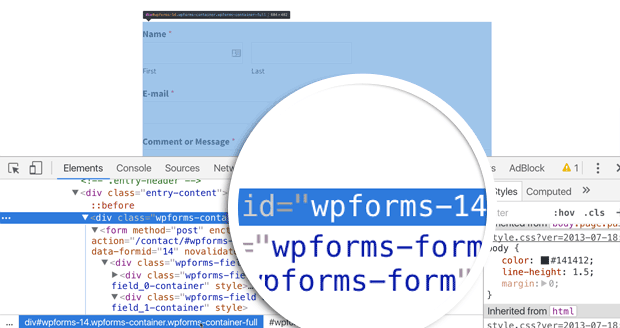
The browser screen will split, and you will see the source code of the page. In the source code, you need to locate the starting line of the form code.
As you can see in the screenshot above, our contact form code starts with the line:
1 | <div class="wpforms-container wpforms-container-full" id="wpforms-14"> |
We will use this ID in our CSS to style our contact form. We will replace .wpforms in our first CSS snippet with #wpforms-14. The id attribute is a unique identifier generated by WPForms for this particular form, so the style won’t apply anywhere else.
For example, you may simply insert the following snippet at the beginning of the first code snippet.
1 | div#wpforms-14 {background-color: transparent; !important} |
Now let’s take a look at a few different ways to style your form buttons with CSS.
1. Create a Transparent Background
Do you want to create a transparent background for your WPForms button?
Transparent background buttons, also known as ghost buttons, are a popular web design trend that is usually used in forms and call to actions placed on top of wide background images. Take a look at a few examples of transparent buttons on different websites.
Example #1: Transparent Form Button
Example #2: Transparent Call-to-Action Button
With WPForms, you can easily create a transparent background for your forms button. To create a transparent background button, all you need to do is to copy the below code snippet into your Additional CSS section.
1 | div.wpforms-container-full .wpforms-form button[type=submit] { |
5 | background-color: transparent; |
7 | border: 2px solid #0099CC; |
11 | text-transform: uppercase; |
Here’s how the button will look like:
2. Create a Gradient Button
Unlike ghost buttons, using a gradient button isn’t a new trend. However, if those multicolored gradient style buttons are best suited for your website, you can follow this tutorial. As it’s done with CSS, you can easily scale it up or down without losing resolution.
In the below CSS, we’ve used browser-specific styles to make sure the gradient shows up on as many different browsers as possible.
1 | div.wpforms-container-full .wpforms-form button[type=submit] { |
5 | text-transform: uppercase; |
11 | background: -webkit-linear-gradient(#e5f4f9, #b2e0ef, #7fcce5, #0089b7, #0099CC, #b2e0ef); |
13 | background: -o-linear-gradient(#e5f4f9, #b2e0ef, #7fcce5, #0089b7, #0099CC, #b2e0ef); |
15 | background: -moz-linear-gradient(#e5f4f9, #b2e0ef, #7fcce5, #0089b7, #0099CC, #b2e0ef); |
17 | background: linear-gradient(#e5f4f9, #b2e0ef, #7fcce5, #0089b7, #0099CC, #b2e0ef); |
Here’s how the image will look like:
3. Create a Rounded Corner Button
Do you want to draw users’ eyes to the call to actions? According to some research, rounded corners enhance information processing and draw our eyes to the center of the element.
If you’re looking to attract users’ attention, you might want to test your
form conversion rates by creating a rounded corner button for your WordPress form.
1 | div.wpforms-container-full .wpforms-form button[type=submit] { |
3 | background-color: #0099CC; |
7 | text-transform: uppercase; |
Here’s how the image will look like:
4. Replace Your Button With an Image
Using a graphic button is probably the easiest way to customize the button of your form.
You can easily find several graphic buttons to download and use on stock photo sites. Then you can replace your form’s button with a graphic button. Make sure to upload the button graphic to the media uploader by going to Media » Add New.
Then replace the below URL with your image URL:
http://yoursite.com/your-image.jpg
1 | div.wpforms-container-full .wpforms-form button[type=submit] { |
5 | background-repeat: no-repeat; |
9 | background-position: center; |
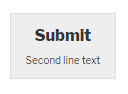
5. Create a Multi-Line Button
Before submitting your form, your users will have several questions on top of their minds. To boost conversions, you can answer those questions with the appropriate copy in or around your button.
For example, let’s take a look at the Mozilla Firefox’s button. It includes all the necessary details of the downloadable file, so users don’t have to go back and verify those details before clicking the button.
When creating a button for your form, look at it through the eyes of your visitors. It helps you to write the appropriate copy for your button geared towards conversion.
In most cases, to include all those details in your button you’ll have to create a multi-line button. Here’s how to create a multi-line forms button in WPForms.
1 | div.wpforms-container-full .wpforms-form button[type=submit]:after { |
3 | content: 'Second line text'; |
Here’s how the image will look like:
We hope this guide helped you to customize button styles with CSS.
If you like this article, then please follow us on
Facebook and
Twitter for more free WordPress tutorials.
How to Add Custom CSS to WPForms
Would you like to customize the appearance of your WordPress forms? In WPForms, you can easily add custom CSS classes and styles to make your forms look how you’d like.
In this tutorial, we’ll show you how to add custom CSS classes to style specific form elements, as well as how to add any custom CSS to your WordPress site.
What’s a CSS Class?
CSS classes are a way of targeting which elements you’d like to style in your website.
In WPForms, fields are automatically assigned several CSS classes. For instance, if a field is set to a Field Size of Large, it will be assigned the CSS class wpforms-field-large. However, this class is only useful for custom CSS if you’d like to style every large form field on your site.
By adding a custom CSS class you can easily target a specific form field, or apply the same styles to multiple fields.
How to Add Custom CSS Classes in WPForms
In WPForms, you can add your own custom CSS classes to individual form fields, the submit button, or the container around your form.
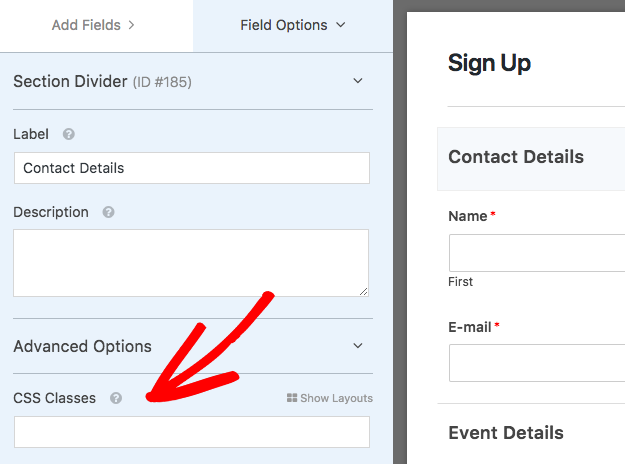
Adding CSS Classes to Individual Form Fields
To add a custom CSS class to a form field, first
create a new form or edit an existing form.
Within the form builder’s preview panel, click on the field to open its Field Options. Then, open the Advanced Options section and look for the field labeled CSS Classes.
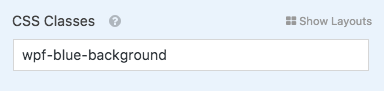
When naming a CSS class, all letters must be lowercase and no spaces are allowed. If you’d like the class name to contain more than one word, include a hyphen (-) instead of a space. For this example, we’ll name our CSS class wpf-blue-background.
By adding wpf- to the beginning of our classes, we’re less likely to add a class name already being used by our site’s theme. This will help to avoid style conflicts and make it more likely for our styles to be applied successfully.
You can add additional classes to this field also, if you’d like. To do that, simply add a space between each class name. For example:
wpf-blue-background wpf-bold-font wpf-xl-margin
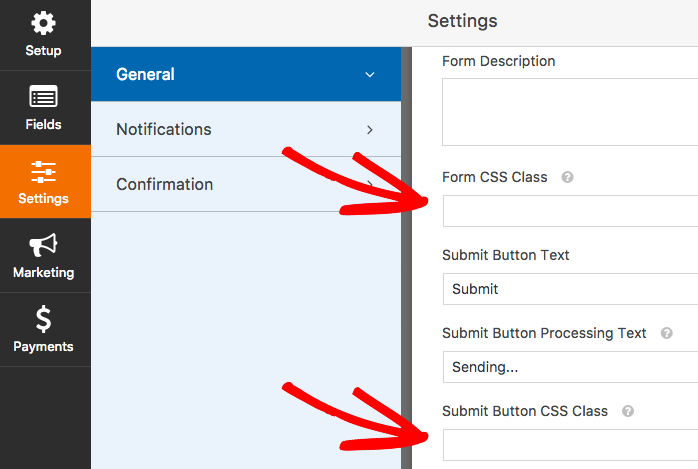
Adding CSS Classes to Form Container or Submit Button
For some styles, it may be useful to target the form’s container or its submit button.
For example, you may want the submit buttons for all sign up forms on your site to be styled one way, and for the submit buttons in any general contact forms to be styled a different way. An easy way to accomplish this is by adding the same CSS class to the any submit button that you’d like to be styled the same way.
To add a custom CSS class name for either option, open the form builder and go to Settings » General. From this tab, you’ll be able to see fields for Form CSS Class and Submit Button CSS Class.
If you’d like to add more than one class name, just separate each with a space. Also, remember that class names can only include lowercase letters and hyphens (-).
How to Create and Add CSS Styles for Your Site
Now that you’ve added a custom CSS class to a field in your form, you can create the styles you’d like applied.
Creating CSS Styles
CSS is a powerful tool with an extensive amount of styling options available. For instructions on how to get started with creating CSS, please see
our Beginner’s CSS Guide.
For our example, we’ll simply add a blue background to any field with the class wpf-blue-text. When writing a class name within CSS, it must always begin with a period (.), for example .wpf-blue-background.
Since many styles are already being applied to your form, it’s also a good idea to make your CSS more specific. To do that, simply add div.wpforms-container-full .wpforms-form in front of your custom class name.
Here’s our example CSS:
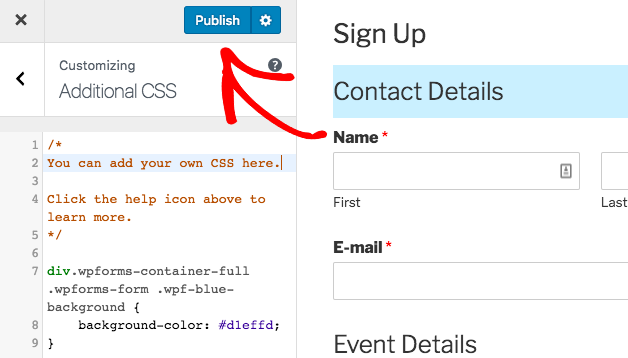
div.wpforms-container-full .wpforms-form .wpf-blue-background {
    background-color: #d1effd;
}
Adding CSS to Your WordPress Site
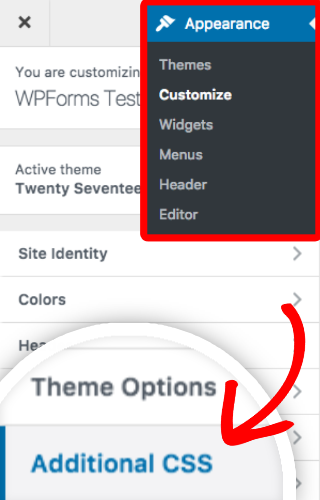
One quick and easy way to add custom CSS to your site is with the WordPress Theme Customizer. This is a popular option because it’s available in almost all themes and has a live preview area.
To access the CSS area of the Theme Customizer, go to Appearance » Customizeand then select the tab labeled Additional CSS.
Then, under the instructions comment, go ahead and add your custom CSS snippet. If you’d like, you can also use the preview area to check out your style(s) before saving. When you’re ready, click Publish.
That’s it! You can now add custom CSS classes to style specific areas of your forms.


Comments
Post a Comment